Analytics

24 April, 2011

TUTORIAL: Iterators In Quartz Composer - Part 3

Previous Tutorials:


Following the previous two tutorials, we now have an ordered grid of square sprites in our viewer. After making our squares all look the same, we will now add some variation to them.

First of all, we add color. In order to define a list of colors to choose from, we introduce the Multiplexer Patch. This is a very useful patch that simply presents a list of items ordered by index. The list can be as long as we want, and begins at 0. The list can contain colors, numbers, booleans, indexes, data structures, 3d meshes and images. Basically we can make a list of anything we want, choose one item from the list, and this item will be passed on to the output.

In our case, we need a list of colors. We navigate inside the x iterator where our sprite patch is and drag the multiplexer patch there.


In order to select the colors we want, we need to change the settings for the patch. We do this by selecting the multiplexer in out editor and then clicking on the display setting button in the toolbar.


When we do this, we see that the number of inputs is set to 2, and the input type is se to “Virtual”. This means that the multiplexer will accept anything that is connected to the inputs and simply pass is it along. However, we want to pass a specific type of input, so we select the input type drop-down menu and change it to “Color”. We also increase the number of inputs to 5.


We close the settings panel and we can now see our multiplexer sports 5 inputs. It has also been renamed to “Color Multiplexer”. The inspector will also show that the inputs are now all colors. 


Next we select the color inputs and choose a different color for each. With our colors in place, we connect the output of the color multiplexer to the “color” input of the sprite patch. When we select a color from the multiplexer index, that value is passed to all our sprites.


Now our sprites are colored, but what we really want is to assign a different color to each square. In order to do this, we are going to use a Random Patch. This patch generates a random value between a minimum and maximum value that we assign.


The random patch however is animated, and generates numbers continuously when we start the composition following the main timebase. We need the number to be static, and we also need each sprite to have a different number corresponding to the color index. 

First, we right click on the random patch and change the timebase to “external”, like we did in the previous tutorial. This ensures that the number generated will be static. Next, we need to assign a timebase to the patch. We do this by passing the Current Index output  from the Iterator Variables  patch to the timebase input of the random patch. Since we need both indexes from the two different iterators, we have to add them together. 

We add a bit of math to our composition by dragging a Math to the editor. This is used to perform all the basic math functions between two or more values. 


The math patch presents two inputs, and the values are being added. We can change the mathematical operation to anything we want by selecting it in the inspector tab. 
Now we need to connect the two Current Index outputs to the inputs of the math patch, and they will be added. To add the index for the Y iterator, we need to publish the second input of the math patch to the upper level. We can rename the input “Y Current Index” for clarity. The first input will correspond to the X Current Index. 


The multiplexer index only needs values up to 4 even if it has 5 inputs, because it starts from 0. We select the random patch and set the Min value to 0 and the Max value to 4. We then connect the output of the random patch to the index input value of the multiplexer. This will assign a different color to each square in our grid.


And there you have it! Random colors for each square. The values generated by the random patch are not terribly diverse, but we can increase the number of color inputs in the multiplexer patch as much as we want. Just remember that the changes need to the reflected in the maximum value of the random patch.
You can also play around with the Random patch settings tab and see what happens.

Now that we have assigned a different color to each square, we can repeat the process for any sprite attribute we like. For instance, rotation and size. We can assign a random patch to the “Z Rotation” input of the sprite and pass it a random value between 0 and 360. 


We can also do the same for the sprite size, and select different values for Width and Height.


You could also experiment by assigning a different image to each sprite.

And last, to display some interesting color overlap, we can change the blend value of the sprite patch to “add”. This will add the color of the overlapping sprites together when they meet. To make this work better, you should change the transparency of the colors to about 25% or less.


With that we wrap up this series of tutorials. Hopefully by now  you can (with some imagination) see the huge potential of the Iterator Macro, and what can be achieved very quickly by adding some randomness to the composition. Remember to experiment!


(Leave a comment here to request new tutorials)

21 April, 2011

Quartz Composer Voxel Noise Visualisation


This composition employs voxel cubes iterated at either 32x32x32, 64x64x64 or 128x128x128. The Noise patch is fed different octaves of values, and determines wether the voxel is on/off.
I think it’s a very basic version of what Minecraft uses, so it’ll be fun to try and add some textures to the cubes.

Rendering time is approximately 5 seconds for the 64x version. Setting it to 128x ramps it up to 30 seconds. This is without any kind of optimisation though, but still, gah..


17 April, 2011

TUTORIAL: Iterators In Quartz Composer - Part 2


In the previous tutorial on iterators  I showed how to create a simple row of sprites along the X axis. Now we will take that example further, and create a full grid of squares.
The way we do this is by creating multiple copies of the previous iterator macro by putting that macro patch inside another iterator. Right now in our editor we can see the previous iterator on its own (apart from the Clear patch). Because labels are important, we should rename the current iterator by double-clicking on the patch name and inserting a new name, in this case” X Iterator”. While this is not strictly necessary, it helps us distinguish it from the other patches, and is especially helpful if we have a very complex project. 


Next to our X Iterator we create a new Iterator Macro and rename it “Y Iterator”. We copy-paste the X-Iterator inside the Y Iterator macro and get rid of the original, and in the Y iterator we change iterations value to 5 to match the X Iterator.
 Now in our top editor view we only have the Y Iterator and the Clear patch. When we double click inside the Y Iterator to view its contents we find the X iterator. Just like with the previous tutorial, we need to place an Iterator Variables patch inside the Y Iterator Macro, next to the X Iterator. 
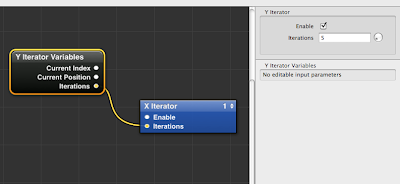
To make sure that the number of iterations are the same for each axis, we connect the output of the Iterations value to the input of the Iterations value of the X Iterator macro. This way, we only need to change the number of iterations of one macro to change both.


We have our patches in place, but how do we send the Iterator Variables output to the Sprite patch inputs? If you remember, we connected the Current Position value to the Interpolator patch to iterate the sprite along the X axis.
 To do the same along the Y axis, we need to repeat this operation, but we need to feed it with a new set of values, this time corresponding to the Y axis. 
However, the original Sprite and Interpolation patches are contained inside the X iterator macro, and there doesn’t seem to be a way for it to receive the new set of values coming from the Y Iterator Variables. You can see that the only input in the X iterator is the one that corresponds to the number of Iterations.


We double-click to open the X iterator macro, and see its contents. We have the original variables, the Interpolator and the Sprite. 
First, we need to create a new instance of the Interpolation patch to feed values to the Y Position of the Sprite. We do this either by copy-pasting the patch, or by selecting it and pressing command-d (cmd-D) to duplicate the patch. Now we should have two instances of the Interpolator.


However, we still need to communicate with the upper layer of the composition. In order to do this, we need to publish some of the inputs of the Interpolation patch. When we publish inputs or outputs, they are transferred automatically to the layer directly above the patch, in out case the X Iterator Macro that contains the patches. We do this by right-clicking on the patch, selecting the “publish inputs” menu, and selecting  “patch time”
Now we are given the option to rename the input, which is useful if you need to publish a lot of inputs or outputs that have similar names. Since we have multiple interpolators in this project, we will rename it “Y Interpolation Time”. This is simply an arbitrary name I have chosen, but obviously it can be anything you want. 


We press enter to confirm, and now we see that the the input has been renamed, and is coloured green. This indicates that the input has been published to the upper layer. If we navigate back to the view inside the Y iterator macro, we can see that the X iterator macro contains a new input, corresponding to our renamed Patch Time input from the interpolator below.


Now all we have to do is repeat what we did in the previous tutorial, and connect the Current Position output value from the Iterator Variables patch to the new input we created. This will send the information straight below to the Y position Interpolation patch.


We then open the X Iterator macro and connect the output value for the second Interpolator to the Y position input of the Sprite patch. As you can see, we now have a full grid of Squares positioned along X and Y, for a total of 25 squares. 


Of course we can change the number of squares per axis and play around with the inputs, but before there are a few steps we can take to “polish” the composition a bit. These steps might seem trivial for such a simple composition, but they come in handy when you have a large number of patches and layers.

First, we should learn about Input Splitters. These are accessed the same way we publish inputs, by right-clicking on the patch and selecting “input splitters”. When we select a value to split, we create a small node connected to the patch input representing that value, whatever the value is. We can rename it, change the value, but most importantly we can now easily share the value between multiple inputs, meaning that when we change that value, all the inputs are updated so that we don’t have to change each one manually all the time.


As an example, we can consider the Width and Height settings of the Sprite Patch. In our case the sprite represents a square, so the two values are always the same. But every time we need to change the size of the square, we need to repeat the operation twice. So we create a splitter for the Width value, rename it to “sprite size” and connect the output to both the width and height setting. Now we have a single value to control both inputs!
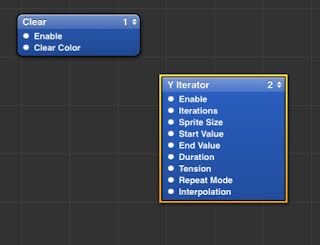

We can use the same process to share values between the two interpolators, so that we can edit the values easily, since our squares are supposed to be on an ordered grid.


Now that we have a set of values that control the size and placement of our squares, it can be useful to publish all out inputs to the top layer. This will save us the need to dive into the heart of the composition every time we decide to change a value. We simply right-click on each splitter and publish the values to the upper layer. By repeating the process on every layer of the composition, we end up with a top level macro with lots of inputs that control the patches at the heart of the composition.


 Finally, we can publish even this top-level set of inputs one more time, but where do they go? The answer is, in the viewer. 


This is a really clever option in Quartz Composer, and it means that you can run the composition in full screen from the viewer, and still have access to your input values allowing you to play with the settings and see the results right away. To access the settings, simply click on the Input Parameters button in the viewer, or click cmd-t with the viewer selected. 


We have seen how to use the iterator, and we have placed an Iterator inside another Iterator to create a grid of squares. 
So far the results of the tutorial are functional but don't look very fancy, so next time we will see how to assign separate values such as colours and rotation to each square in the grid. I hope this tutorial was helpful to you.


Other Tutorials:

-Part 3


(Leave a comment here to request new tutorials)

16 April, 2011

Quartz Composer Voxel Terrain Test 2

I've been trying to push my voxel composition a bit further. I noticed that switching from 64bit to 32bit QC shaves 2 seconds off the rendering time. No idea why, isn't 64bit-everything supposed to be faster?

I've also been adding color to the voxels. I've been using sprites exclusively instead of cubes to save on processing time. Color is dependent on the height of the voxel. I also used a gradient map to add terrain-like color mapping to the composition. Unfortunately this adds a lot to the rendering time, so instead of a good 5 seconds I now get 11 seconds.

-Interpolation:

This batch still uses two interpolation patches for the height values, useful if you like repeating patterns.


-Noise:

After using interpolators for a while, I tried switching to the Noise patch for the height values. I added multiple octaves to the noise input, in order to get different results. This is quite pleasant and more what I was aiming for, since now it looks a bit more controlled and landscape-like.

The downside of using color height maps is the performance hit. The two-color examples use a grid of max 256x256 iterations (128x128 gets very similar results though), but for the multi color ones I have to stop at 64x64.
Using 128x128 seems to crash or freeze Quartz Composer. Still good for pixel art I guess :-)