
This tutorial will outline basic use of the Mesh Creator patch and the Mesh Renderer patch in Quartz Composer, in addition to the Kineme Structure Maker patch.
The fundamental thing to understand about creating 3D meshes in QC is that the application in this regard is a basic front for common OpenGL functions. Therefore, to gain a basic understanding of how these things work we can first consult any tutorial on OpenGl basics, then find a way to apply it to QC.
A good resource for this is the series of tutorials by NeHE productions .
We will create a basic polygon, and assign colour and texture coordinates to it so that we can change its appearance and display images on its surface.
To begin, we drag in the Mesh Creator patch. This patch is responsible for taking in all the data required to create a polygon and creating a mesh from it. The mesh will then be displayed by the Mesh Renderer patch.

A polygon is, at its most basic, a series of vertices. Each vertex is in turn a point in space, determined by its XYZ position. In order to create a polygon we will therefore need to first specify the XYZ coordinates of a vertex, repeat the process for the amount of vertices required to determine the shape chosen, then feed this to the Mesh Creator and then to the Mesh Renderer.
What kind of input does the Mesh Renderer take? To determine this we hover with the mouse over the "Vertices" input slot, and see that the type is Structure.
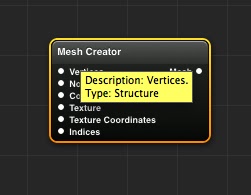
We have dealt with structures in a previous tutorial . This time however we are not just reading a structure, we are creating one. To do this, we require and external patch by the good people at Kineme called Structure Maker. The patch is part of the “Kineme Data Tools” plugin set and is found here.

This patch will enable us to determine a series of inputs and make a structure out of them. To build our polygon we will begin by setting the vertex list. We rename the Structure Maker patch to “Vertices”.
For this tutorial we will create a triangle, so we will need a total of 3 vertices as inputs. In order to prepare the Structure Maker patch, we need to change the number of inputs from the default 1 to 3. We do this by selecting the “Parameters” panels for the patch, navigating to the “Settings” tab and changing the number to 3.

Now that the Vertices Structure Maker is ready, we need to create the individual vertices. As each vertex is determined by 3 values ( XYZ ) we will need to create a structure for each. As we already have a SM patch ready, we duplicate it and rename it to “Vertex 1 - Top”. This will contain the coordinates for the top vertex of the triangle. We also create input splitters for each vertex, remembering to change the input type from “Virtual” to “Number”.


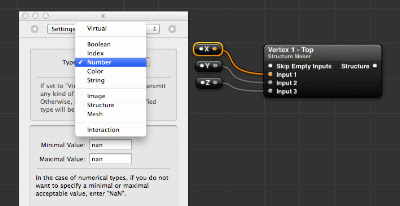
The coordiantes for our "Top" vertex will be: X = 0 , Y = 0.5 , Z = 0 . This will place the top vertex in the centre horizontally but above the centre vertically.
Now all that is left is to repeat the process by simply duplicating the setup for the other two vertices and changing the values to create a triangle shape:
- Top = X = 0 , Y = 0.5 , Z = 0
- Bottom Left = X = −0.5 , Y = −0.5 , Z = 0
- Bottom Right = X = 0.5 , Y = -0.5 , Z = 0

We then simply connect the Mesh Creator output to the “Mesh” input of the Mesh Renderer patch… et voilà! We have our very own triangle mesh created entirely in Quartz Composer.


As you have probably noticed, there are a few more inputs in the Mesh Creator patch. We will be dealing with those in future parts of the tutorial. In the meantime feel free to play with the values of the vertices and perhaps move them around in space.
Notice that even though we have obtained a 2D image of a triangle, the mesh is actually a 3D object able to move around in space, meaning we are not restricted to simple triangles but we can create potentially any shape. That triangle however is the foundation of all 3D models. I hope you have enjoyed this tutorial and make sure to keep an eye open for the next instalments.
Part 2
Part 2